Super mega epic…..FAIL!

Hello peeps!!

How ‘s things?

Today I’ve got a very special post. It is a story of failure, and as sad as I am, it is good to share these stories too for a number of reasons:

1. It helps us accept that things go wrong and it is normal.

2. We learn from our and other people’s mistakes.

3. It is not the -freaking- end of the world.

4. It can be incredibly amusing (of course after all the emotional turmoil is gone..)

So what happened?

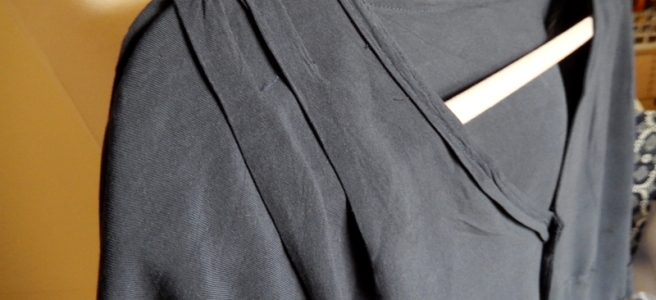
Back in September I bought two meters of wool-poly mix from the remnant box (aka treasure box!) of Rolls and Rems. Luscious gray in colour and slightly stretchy and also kinda scratchy. Now, I am the person who cannot stand scratchy fabrics and goes berserk after 5 seconds of wearing them, and not even straight on my skin. So this had to be lined, whatever it was going to be.

2014-10-21 17.40.48


Months went by, ideas went by. I finally decided I would make some sort of coat/jacket/cardigan to avoid the scratching business and after some more ideas, I found the Eagle by Vanessa Pouzet

Isn’t it JUST GORGEOUS?

I got the pattern, taped, traced and cut.

I did not have enough fabric to cut 4 pieces of the front as required, and was not keen on the idea of using a different one on the inside, although I did have some super soft wool in my stash that would go great.

Mistake no 1: I decided to go for a simpler version and skip the lining altogether. The plan was to finish the edges with bias binding- hey maybe even find some leather tape? that would be awesome!

I completely ignored the instructions and put the whole thing together, missed the makings on the yoke and ended up with something that did need a couple of tweaks but could actually work.

But then I could not find a reasonably priced AND decent looking leather bias tape (any suggestions welcome!)

Mistake no2: Ok fine I will put the whole lining business in. So I go ahead and cut the two missing fronts and two sleeves from my other very nice soft wool and the back lining piece from some leftover black cupro. I construct the whole thing again  and end up with and inside and an outside ready to be connected.

Mistake no3: All was done very nicely and neatly on my overlocker. BIIIIIIG mistake.

So, obviously for those slightly more experienced than me, yeah you cant put them together now! That’s not how you line something, there is a pretty complex sequence here and there is a reason why! TO LOOK GOOD!

Mistake no4: Instead of going back to my original binding idea that would still work, I decided to cut everything out and put it together all over again, this time (only a little too late, M) following the instructions.

2015-03-30 17.49.49

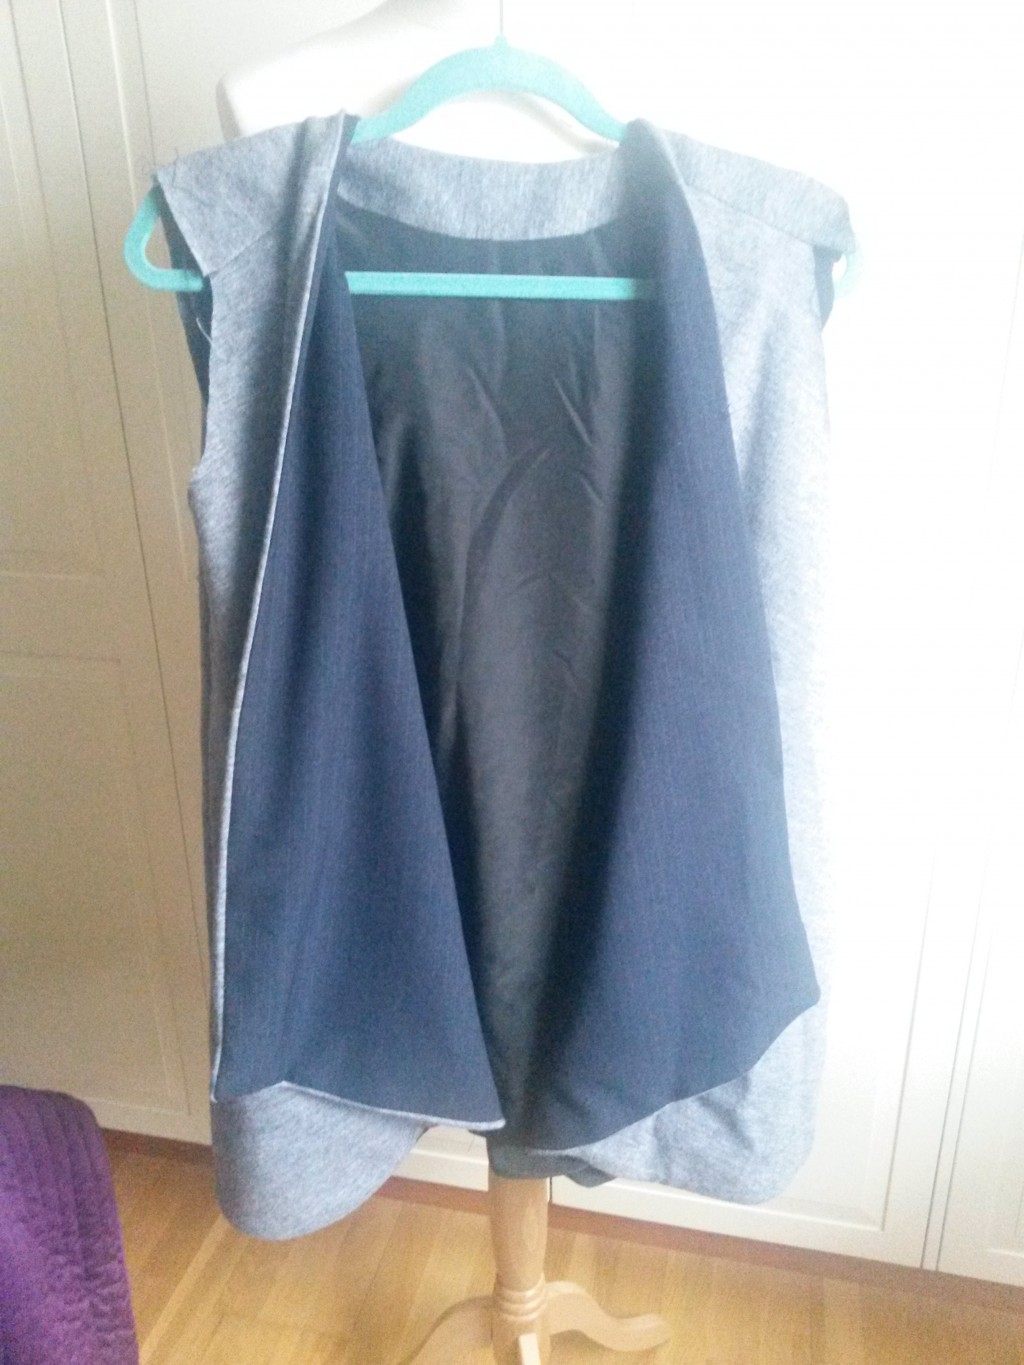
Oh, the wishful thinking. Of course now all the pieces were slightly smaller, and not in a 5/8″ kind of way, in an uneven and not sitting together very well kind of way, as my construction was different for the outside (that was not meant to be lined) to the lining. Anyway, I tried and I actually did get them to work together albeit not perfectly. But when it came to put the sleeves in? Trimming the seams resulted in my sleeve cap to be significantly smaller than my armscye. Dooong.

With no more fabric to cut new sleeves, and no more steam, inspiration or love for this project, I ‘ve put it away. I might give it a try in a few days, or next winter. Or I might throw it in the bin. I don’t know.

Sometimes that is what happens. And that’s called real life.

Have you been all successes recently or is your bin full too? Do share your failures please!

pyjamas?!

Good morning!

Are you still in your pyjamas? I am!

It is my new set of a Briar and a Hudson!

hudson-briar-pyjamas

Of course, it wasn’t not meant to be a pyjama set, but! but…but….IT IS THAT COMFYYY!

My boyfriend says it is a pyjama set, and I’m not gonna argue there, this guy sleeps in anything (or nothing 😉 Obviously I prefer nothing. Too much info? sorry!)

Moving swiftly on, fabric yet again from the Textile centre, this time from the actual shop in Walthamstow. The pants is a angora type knit and it is super warm, the black details and the pink for the Briar is their plain jersey, which is quite light but very soft and drapey. The only issue with the pink is that it wrinkles like nothng and worse, shows sweat marks big time -universal eeeww- so I will have to keep it as an actual pyjama or a absolute layering piece. (call me a cheapie, but I bet this whole outfit cost something like £4).

Construction wise, all super smooth on my overlocker (finally played nice for a whole garment!) and how great is that when it happens??! It is not very often, so I’m cherishing the moment!

Fit wise for the pants exactly like my first pair.  For the briar, same as always a good sway back adjustment, larger  armscye and take in at the CB.  Works pretty well and I do adore the briar, and all it’s versions!

And while we’re on the topic, I ‘m really tempted to make some proper pyjamas! and/or  these?!

I do have 5m of gorgeous flannel in my stash- picked by him!- for his and hers pyjamas, so this might be happening very soon, watch this space 😉

Happy lounging, people!


The InsideOut Blouse

Well hello again, stitchers!!

How are we doing?

Sorry for the radio silence around here, it’s been madness! I’ve had visitors, I’ve had weekends away, I am packing packing packing for my big France move in a month (eeeek!!!) and I’ve had very little time to stitch and much less time to take photos and blog :(((

But well, here I am, with an inside out top, and all French seamed! (how appropriate!)

This whole project was inspired by 3 things:

1. The need of a flowy spring blouse.

2. The Monthly Stitch Inside Out Challenge

3. The gorgeous navy viscose I got in Goldhawk road.

Then, there was a sale on Vogue patterns, and I found 1247 and in fact it’s the blouse I ‘ve been dreaming of all my life! Easy, effortless, interesting, and infinite possibilities!

I also love the skirt design, but it will have to wait for now..

So, here we are, a looooooot of French seaming later!

1247front3

Fit wise, only a sway back adjustment of 1″ above waist and that is it! Also, I cut the back on the fold to eliminate that back seam- what is the point of that?! For the looseness of the design, I ‘m very happy with the fit, and I would not really change much on my next version, maybe taking the CB in a little more than just the seam allowance.

1247back

Construction, well, it looks like a complicated design, but actually it is a bunch of straight lines. I did mess up one panel at some point and had to do it all over again, but even so the whole blouse was done in two sessions of maybe 4 hours each? not bad me thinks! I’m also pretty sure I’ve done the sleeve bands wrong, but who cares?! I like them as they are!

1247insidefull

The only issue with this was pressing, as the silky viscose marks like nothing, and french seams do need a good press, this was a nightmare, even with cover cloths and inside out pressing. Would a Teflon cover prevent that? Any advice here?

I’m really very pleased with this one, and I love that I took the time to make something that is so neat on the inside, it makes a massive difference about how I feel when I wear it. Unfortunately it’s still too cold, so I’m patiently waiting for the temperature to rise….

How about you? Are you preparing for spring yet?

Perfect pattern parcel!

Well, hello again!

How’s everyone?

Me? I’m great! Cause I’ve made the ultra-mega-super-cosy garment: The Hudson!

hudson1

hudson back

(what? I can’t go to work like this? I think i can!)

Honestly, this is my favorite pattern of ALL times. It is easy, comfortable, super quick, can be styled in so many ways and best of all- best fit for this style of trousers ever! I ‘ve got about 10 pairs of this style and none of them fits  right- off to the charity shop! Super-happy-dance for the hudson now!! I cut size 10 (I went two sizes up than my normal size as I like a comfy fit) and it is PERFECT! The fabric is a super soft knit- wool feel polyester from the Textile Centre, what was left from making a Briar on a 2m piece. The waistband, pocket detail and cuffs in grey cotton jersey.

hudson pocket           hudson waistband         hudson cuff

(This has been in constant wash/wear cycle ever since!)

Obviously, instant gratification! Which leads to excitement, and boom! sewing mojo!

So I immediately went on and made a Bronte top. All this comes from the Pattern Parcel no6- aka Perfect pattern parcel 😉

bronte face

Hey-ho, another great success! Minor adjustements- a sway back of a generous 1″, and grading the armhole to a size up and that ‘s all. And it is PERFECT! Seriously, RTW Tshirts don’t fit that well (maybe the ones from Uniqlo do, why buy when you can make?!) This also came from a remnant piece in my stash, which has produced 2 Briars (one for me and one for my friend Laura) and a pleated skirt, so there was almost no fabric left but now I’ve got a Tshirt, so seriously, Bronte? Ultimate stash buster!!

And here is me wearing it- at work-taking pictures- before my patients (I am an osteopath) (get to work girl!).

bronte wear

Now, my overlocker had a lot of trouble with most of my Hudson, mainly because the knife was not playing nice. So i had to trim by hand and overlock without the blade which worked fine but not as fast as it could be. I then got new knives, struggled for two hours with unscrewing the old ones, managed only the lower one, but then it worked like a dream! So the Bronte happened in a moment!

The only negative is that they don’t go together, but then that’s a great excuse for making more and more and more…

Aren’t snuggly well fitting knits the best?!